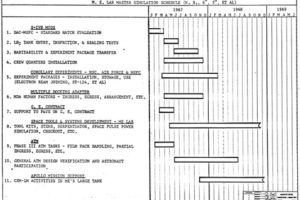
Adding tasks to a timeline in Microsoft Project is fairly straightforward, however, Microsoft Project doesn’t include a basic timeline template. If you don’t have time to find a timeline template from a third-party vendor, you’ll need to manually create a Gantt chart in Microsoft Project first.
Here’s how to create a Gantt chart and then use that data to build Microsoft project timelines.
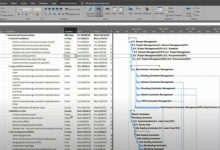
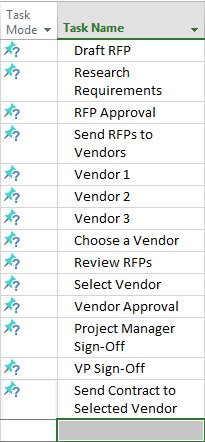
1. Create a Task List for the Microsoft Project Timeline
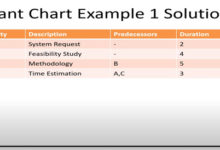
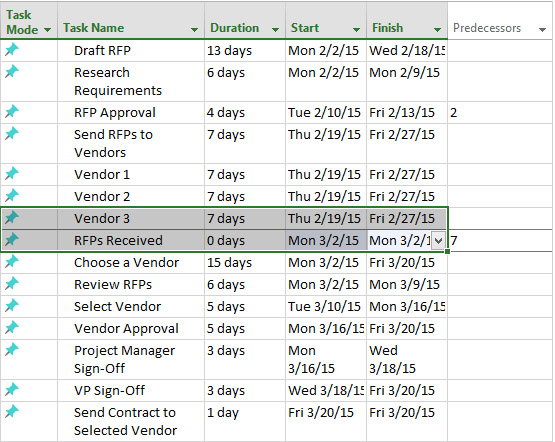
The first step in building a Gantt chart is to create a list of required tasks. Try to prioritize the tasks in the order they need to be completed. Even if there are dependencies involved, put in tasks that need to happen first.
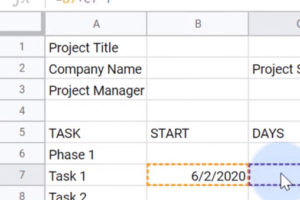
(1) Open Microsoft Project and click Blank Project.
(2) Add the list of tasks for the project to the Task Name Column.
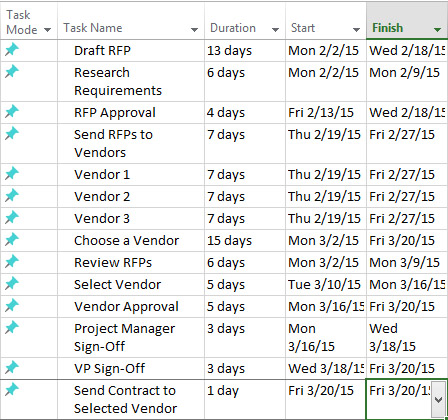
2. Provide Start and Finish Dates for Your Timeline
Now that your tasks are added, you need to provide start and finish dates for each one in the project.
(1)Click on the Start cell for the first task.
(2)Enter the start date by clicking on the arrow in the box and selecting it from the calendar or enter the dates manually.
(3)Enter the end date for the task by clicking on the corresponding Finish cell. Click the arrow in the box to select a date from the calendar or enter the dates manually.
(4)Leave the Duration cell empty, Microsoft Project will automatically populate the amount of days the task will take.
(5)Complete Start and Finish dates for all other tasks in the project.
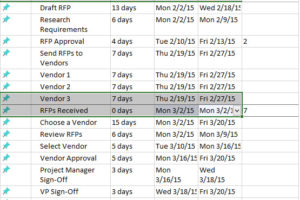
3. Group To-Dos Together that Pertain to a Single Task
The benefit of grouping tasks together is that you’re able to collapse or expand the specific steps required to complete a phase of the project. This can help track a particular part of a project and help you identify dependencies.
First, you’ll need to create sub-tasks.
(1) Create a sub-task by clicking on the rows of tasks that are related to a specific phase of the project. These tasks should be listed under the project phase. In this example, click and highlight Research Requirements and RFP approvals. To add multiple rows, hold down the Shift key as you click each row.
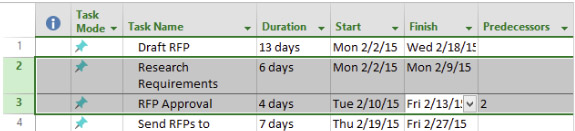
(2)Once the rows are highlighted, click the right indent icon in the ribbon bar. Once you click the indent icon in the ribbon bar, Research Requirements and RFP Approval will become sub-tasks of Draft RFP.
(3)Use the same steps to create sub-tasks for the entire project.
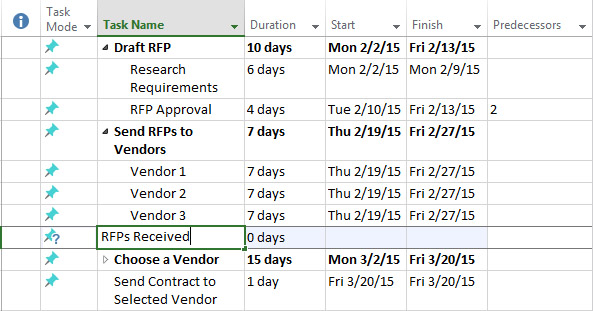
4. Add Milestones to the Timeline
Milestones are a great way to see if the project is running on schedule and to signal the end of a particular phase.
(1)Create a Milestone by adding a new row, putting it where you want it to appear in the timeline. Click the row to add a Milestone.
(2)In the Task tab, click the Milestone button in the ribbon bar.

(3)Click in the cell that has New Milestone and type a name for the Milestone. The Milestone will appear as a diamond on the Gantt chart.
5.Link Related Tasks to the Milestone
Once you’ve added a Milestone, you’ll want to link it to the Task that has the complete date.
(1)Click on the Milestone in one row and hold the Shift key down while clicking on the task(s) you want to link it to. The rows will be highlighted.
(2)Click the link icon in the ribbon bar to link the tasks. You can also link other Tasks together by following the same steps.
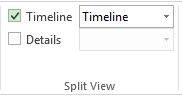
6.Turn on the Microsoft Project Timeline Feature
If the timeline feature isn’t automatically turned on (if it’s activated, you’ll see a blank timeline above the Gantt chart), you’ll need to manually turn it on.
(1)Click on the View Tab. Then click the box next to Timeline in the ribbon.
7.Add Tasks to the Microsoft Project Timeline
Once the Timeline feature is activated, you can add your tasks to it. Once you add these items, you can also customize how the information is displayed by assigning colors and adding/removing titles.
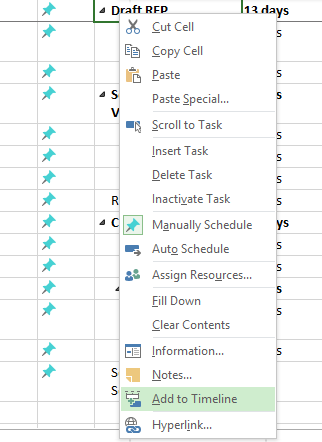
(1)Click on the task to add it to the Timeline.
(2)Right-click on the mouse and click Add to Timeline. The task will appear on the Timeline.
8. Share the Microsoft Project Timeline
Once you are happy with the way the timeline looks, you can share it with others via e-mail, or add it to a presentation.
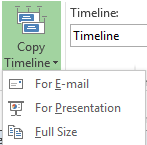
(1)Click the Format tab at the top of the screen and click the arrow under the Copy Timeline button in the ribbon.
(2)Choose how you want to share by clicking For E-mail, For Presentation, or Full Size.
Microsoft Project will save a copy of the timeline to your clipboard. Next, open the program you want to use for sharing, either PowerPoint or e-mail, and paste it in.